Instructors can use Zoom from within their Canvas courses to schedule recurring virtual class meetings, record class sessions, and generate captions and transcripts for videos recorded in Zoom.
This guide focuses exclusively on using Zoom within Canvas. For more general Zoom guides, see our Zoom Overview guide.
Important Notes (Read this first!) #
- Before you can use this feature in Canvas, you will first need to set up your UMW Zoom account by going to https://umw-sso.zoom.us/, clicking “Sign In,” and logging in with your UMW Net ID and password.
- Please contact the IT Help Desk for issues or questions about accessing, setting up, or using your UMW Zoom account.
- Zoom has a robust collection of online guides. If you have a question about a specific feature, you can often Google the term to find step-by-step instructions for exactly what you are looking for (e.g. “Zoom breakout rooms”).
- Make sure to keep your Zoom client up to date! Many features are not available with an outdated Zoom client. See this guide for instructions on updating Zoom.
Scheduling a Zoom Meeting #
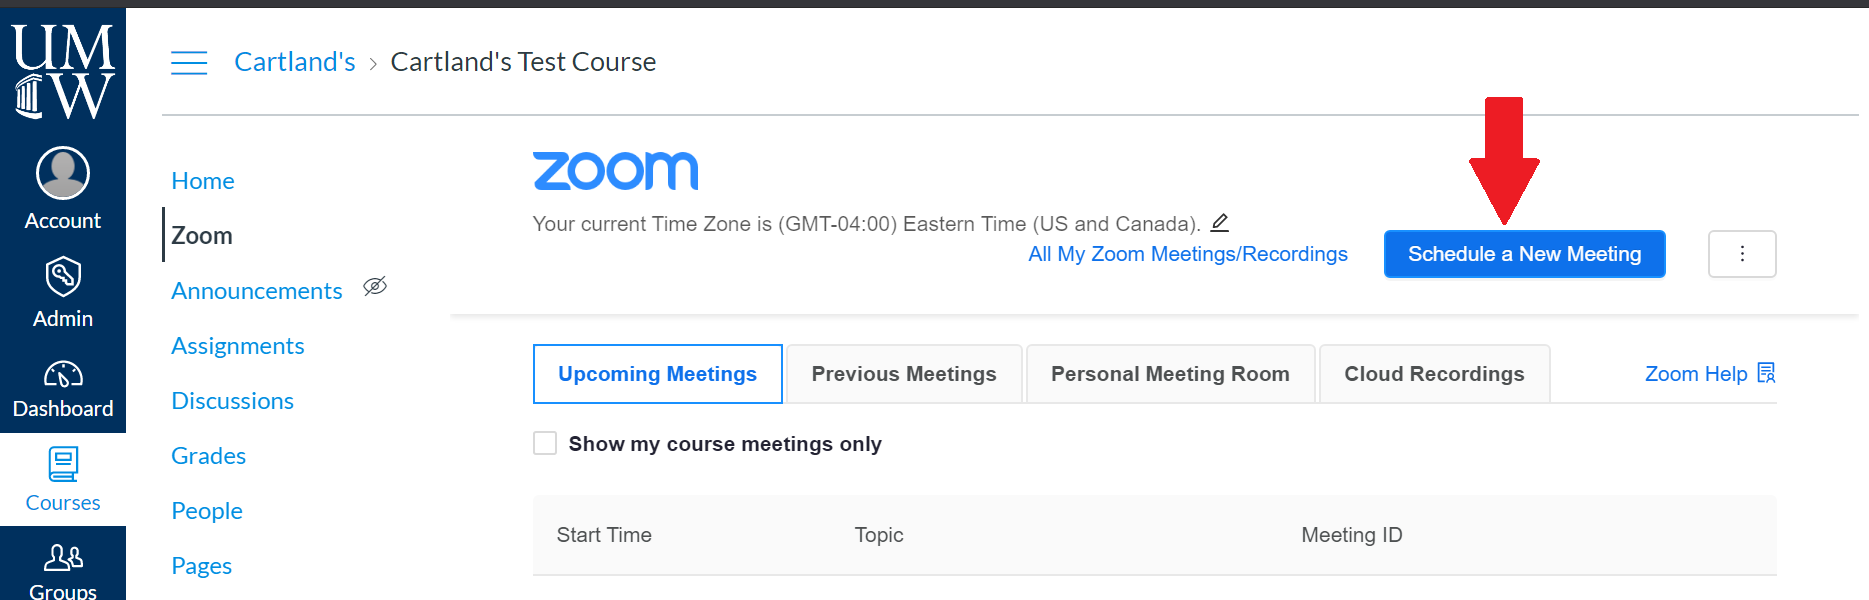
- Click Zoom from your course navigation menu. You may be prompted to “Authorize” the Zoom app.
- Note: The Zoom option may not be a top the of the navigation menu as shown here – it is often near the bottom.
- In the Canvas Zoom dashboard, click Schedule a New Meeting
- Fill out the meeting settings
- Topic: the title of your meeting, which could be your course name or “Office Hours”
- When: the date and time of the meeting
- Duration: the total length of the meeting (your meeting will not end automatically when this time is up, this will just establish the duration of the meeting on your students’ calendars)
- Recurring meeting: Select this for regularly scheduled repeating meetings (e.g., weekly class meetings). Using this feature, you could set your weekly class meetings at the start of the semester, and never have to touch it again for the duration of the class.
- For example, you could use the following settings for a class that meets every TR:
- Recurrence: Weekly
- Repeat every: 1 week
- Occurs on: Tues, Thurs
- End date: 12/03/2020 (last day of classes)
- For example, you could use the following settings for a class that meets every TR:
- Registration: this requires participants to register using a unique registration link prior to joining the meeting, and should generally not be used for class purposes
- Security:
- Passcode: we recommend leaving Passcode checked to prevent zoom bombing. Users who click the link in Canvas will not be required to enter the passcode, even if this is checked.
- Waiting Room: we do not recommend checking this box for class sessions, as it requires you to constantly monitor the waiting room during your class. If you are creating this Zoom meeting for office hours, we do recommend enabling the Waiting Room so that your meetings are not interrupted.
- Video: this determines whether you (Host) or your students (Participant) will have cameras automatically on or off when joining the meeting. We recommend defaulting to off.
- Audio: leave this on “Both” to allow your students to join via phone or their computer microphone
- Meeting Options:
- Enable join before host: We do not recommend checking this box. This will allow anyone with the link to join a meeting at any time, even when you are not present.
- Mute participants upon entry: we generally recommend enabling this option for courses. Students can unmute themselves during the class.
- Use Personal Meeting ID: We do not recommend checking this box for regular class sessions. This is best saved for office hours or drop-in meetings. If you do use your personal meeting ID, make sure to turn on the Waiting Room feature under Security.
- Record the meeting automatically: For remote class sessions, we do recommend recording your meeting in the cloud as a way to allow students to view the class session later with a transcript and automatically-generated captions.
- Important Note: Cloud storage space is limited, so you will need to have a plan for backing up/alternative hosting of your videos if you would like to keep them long-term. You can download these videos to your computer after they are saved to the cloud, and from there upload to YouTube or OneDrive. Videos will not be removed without prior warning from IT.
- Click Save. You will now see the meeting appear under ‘Upcoming Meetings’ in your Zoom dashboard for the course
- Notify your students about the Zoom meeting. Canvas Announcements is a good place to do this.
Special Considerations for Office Hours #
Though the instructions above can be used for a variety of purposes, there are some special considerations for creating meetings that will be shared across multiple classes, such as office hours.
You will need to to repeat this process in each of your Canvas courses.
Note: This method will allow you to set up regular standing meetings that students can drop into, similar to in-person office hours. While this is one option for offering office hours remotely, it may not be the best method for your class. You (and your students) may prefer to schedule appointments in advance, and/or designate office hours as a time when you are available for quick answers via email. If this is the case, instead of creating and posting your meetings in Canvas, you may want to create a Zoom meeting outside of Canvas (using the web application or the Zoom app on your computer), and share the the meeting link with your students only when they book an appointment.
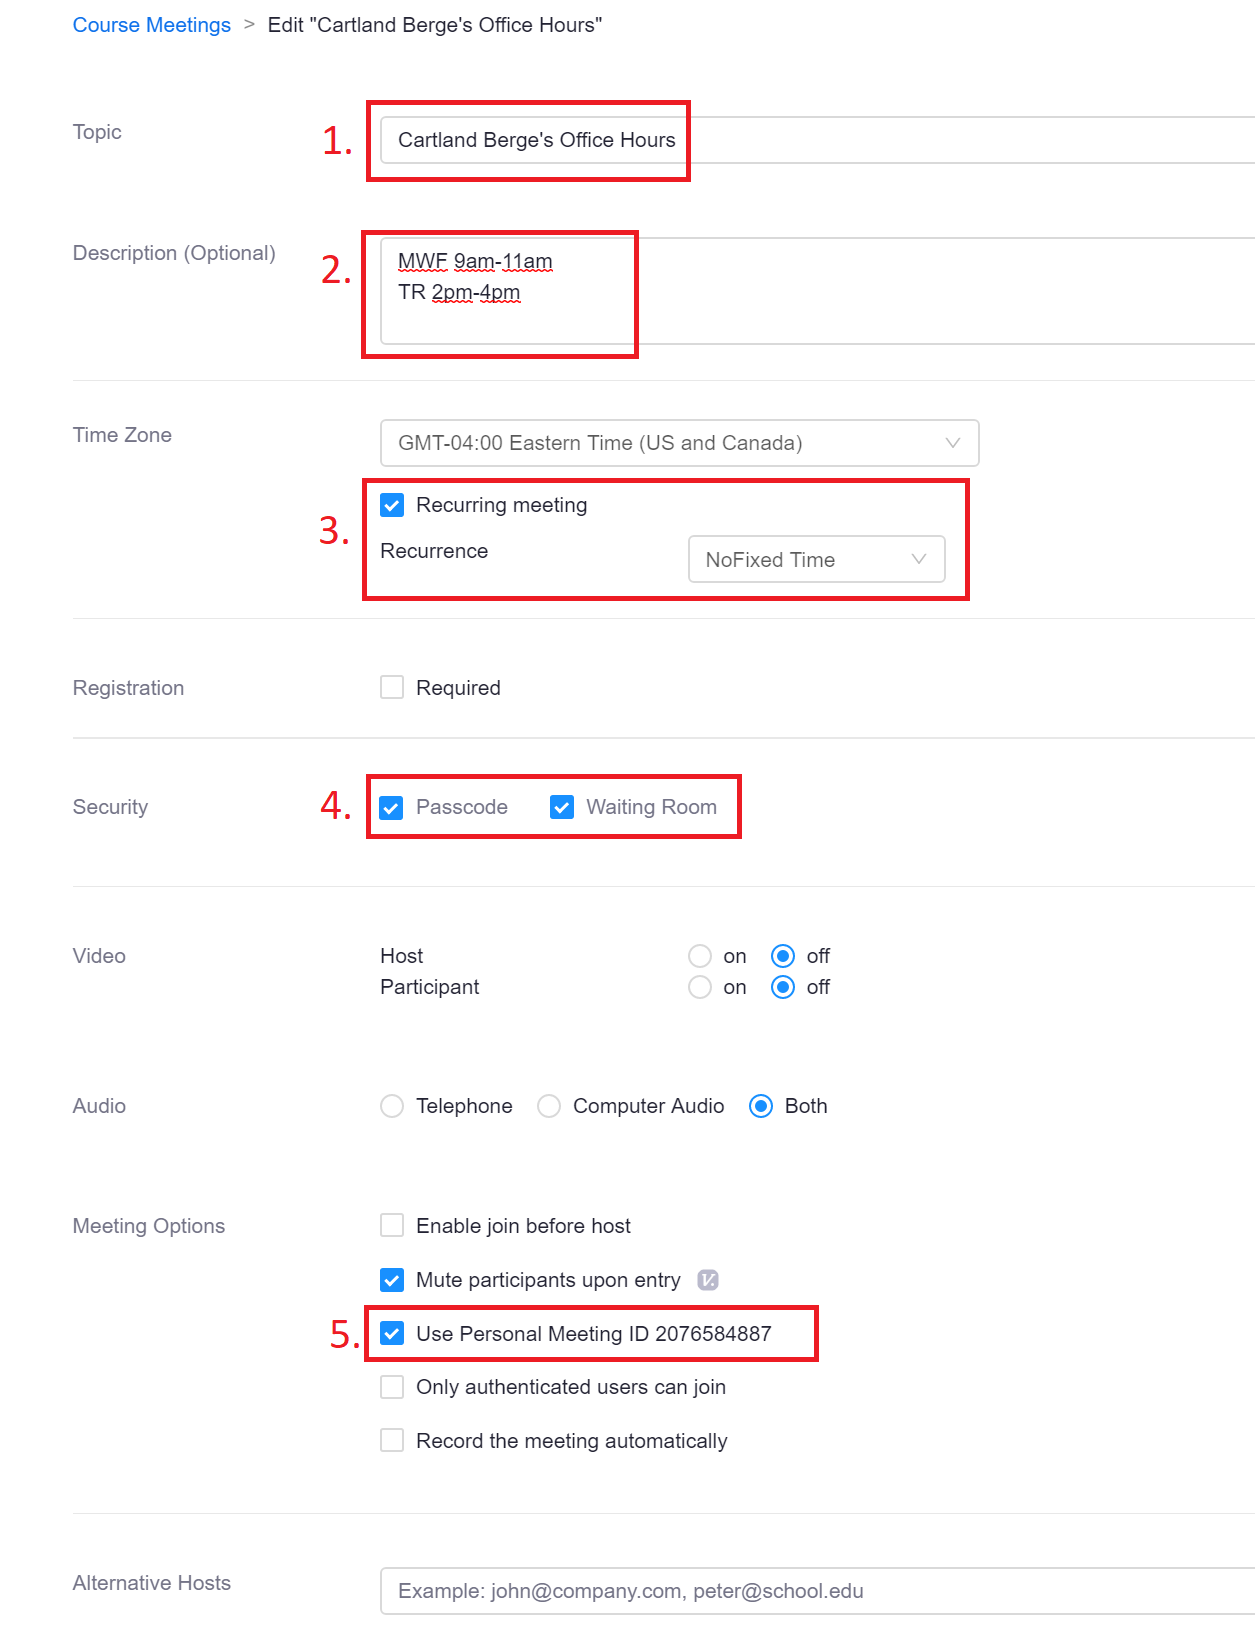
- Name the meeting “[Your Name] Office Hours]”
- [Optional] Write the days and times of your office hours in the Description
- Set the meeting as Recurring, but under Recurrence select No Fixed Time(this will create a standing meeting at the top of you and your students’ “Upcoming Meetings” dashboard)
- Enable the Waiting Room (this is very important to ensure students don’t drop in on a session in progress. You can leave Passcode enabled as well)
- Select Use Personal Meeting ID (this will allow you to have the same meeting link for office hours across all your courses. If you prefer to have different office hours for different courses, do not select this option)
- Once your meeting is created, copy the meeting link and post it in Canvas Announcements along with your office hours schedule.
Starting and Joining a Zoom Meeting #
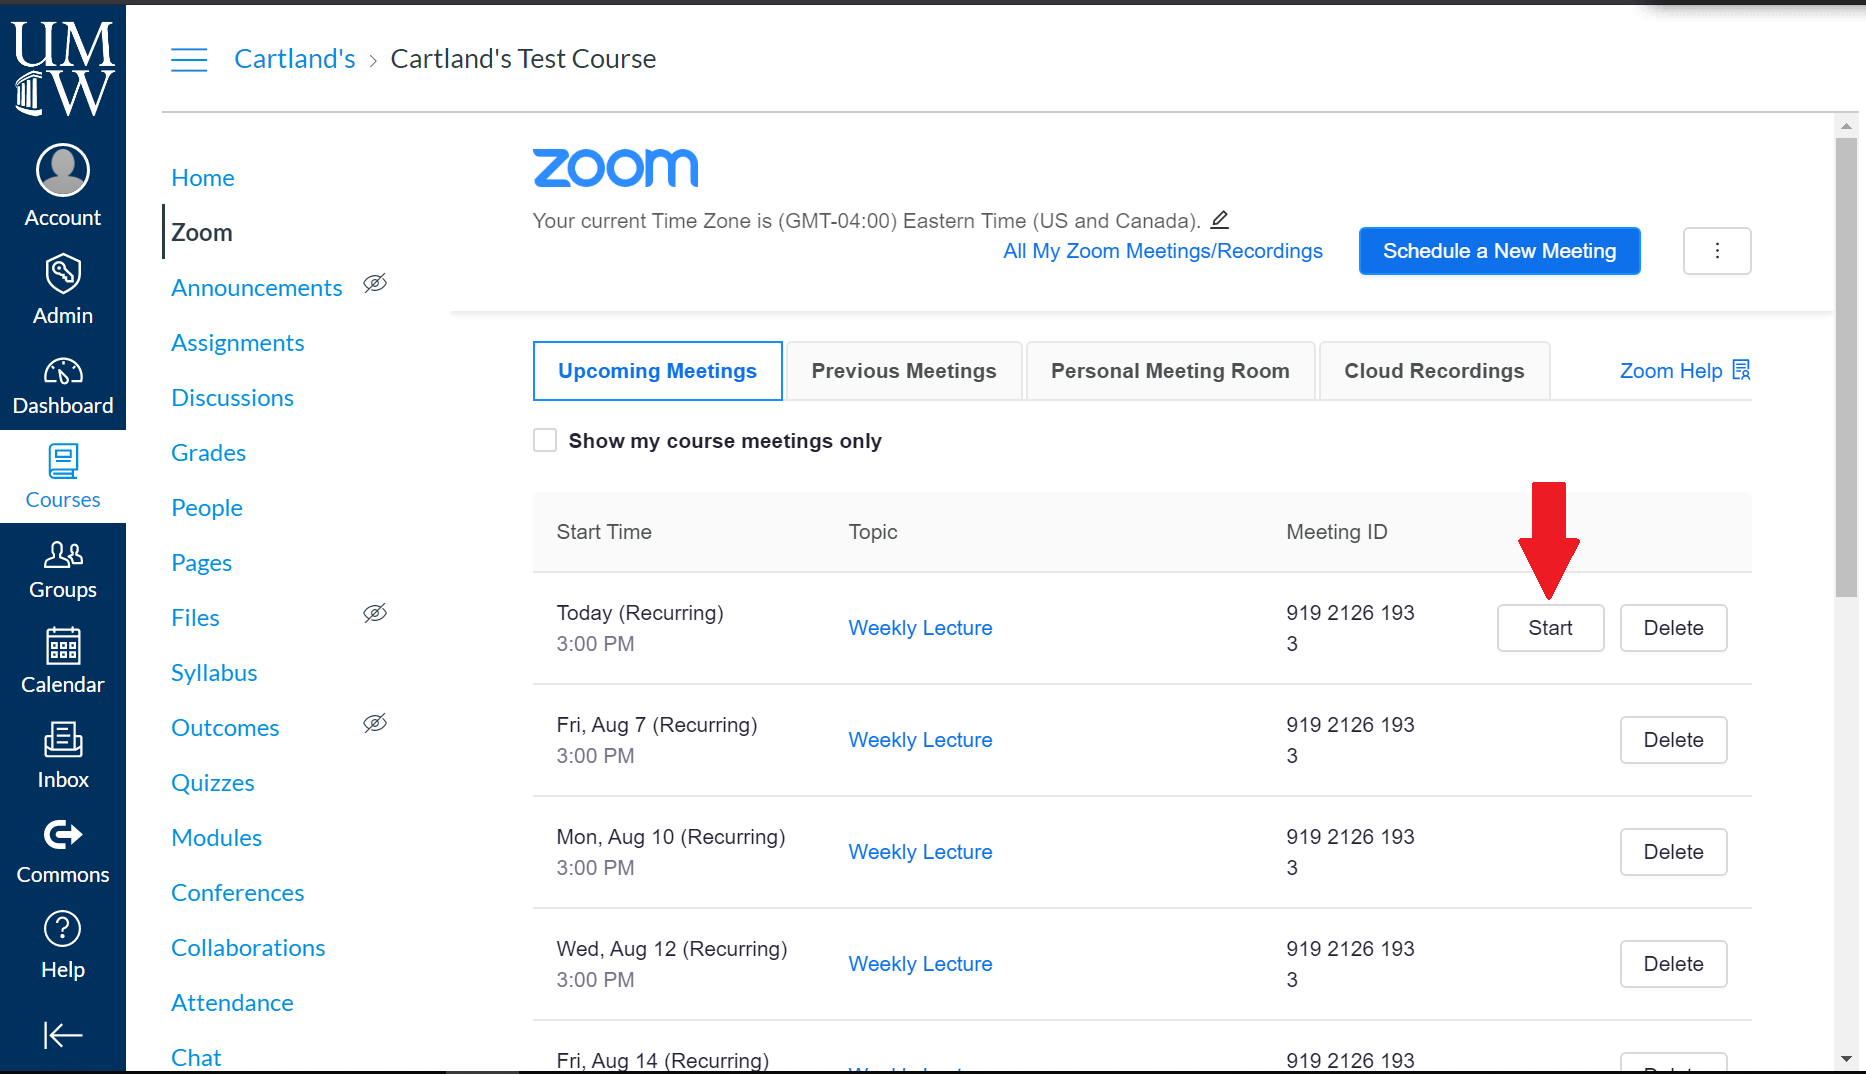
- You can start the meeting from the “Upcoming Meetings” area of your Canvas Zoom dashboard.
- For your students, this button will be replaced with a Join button. As long as you did not select “Join Before Host” when creating the meeting, students will not be able to join the meeting until you have started it.
- Note: If you test this in Student View, the pink “You are currently logged into Student View” sometimes covers up the Zoom link in the navigation sidebar. You may need to adjust your screen size to see the link.
Accessing and Publishing Meeting Recordings #
Zoom cloud recording is a great short-term solution for recording class sessions and easily sharing them with your students. The Zoom cloud generates a transcript and auto-captions, though these will need to be edited for accuracy.
Important Note: Our Zoom cloud recording storage capacity is limited, and will need to be cleared out periodically. Recordings will not be deleted without warning, but you should have a plan for backing up any recordings you want to keep long-term (YouTube and OneDrive are two good options).
- If you checked “Record the meeting automatically – In the cloud” when creating the meeting, or started a cloud recording during your meeting, you and your students can find the recordings under Cloud Recordings in your Canvas Zoom dashboard.
- In order for your students to see the recording, you must click the “Publish” toggle after your meeting completes. You can unpublish recordings at any time by clicking this toggle again, which keeps the files in the cloud but hides them from the student view.
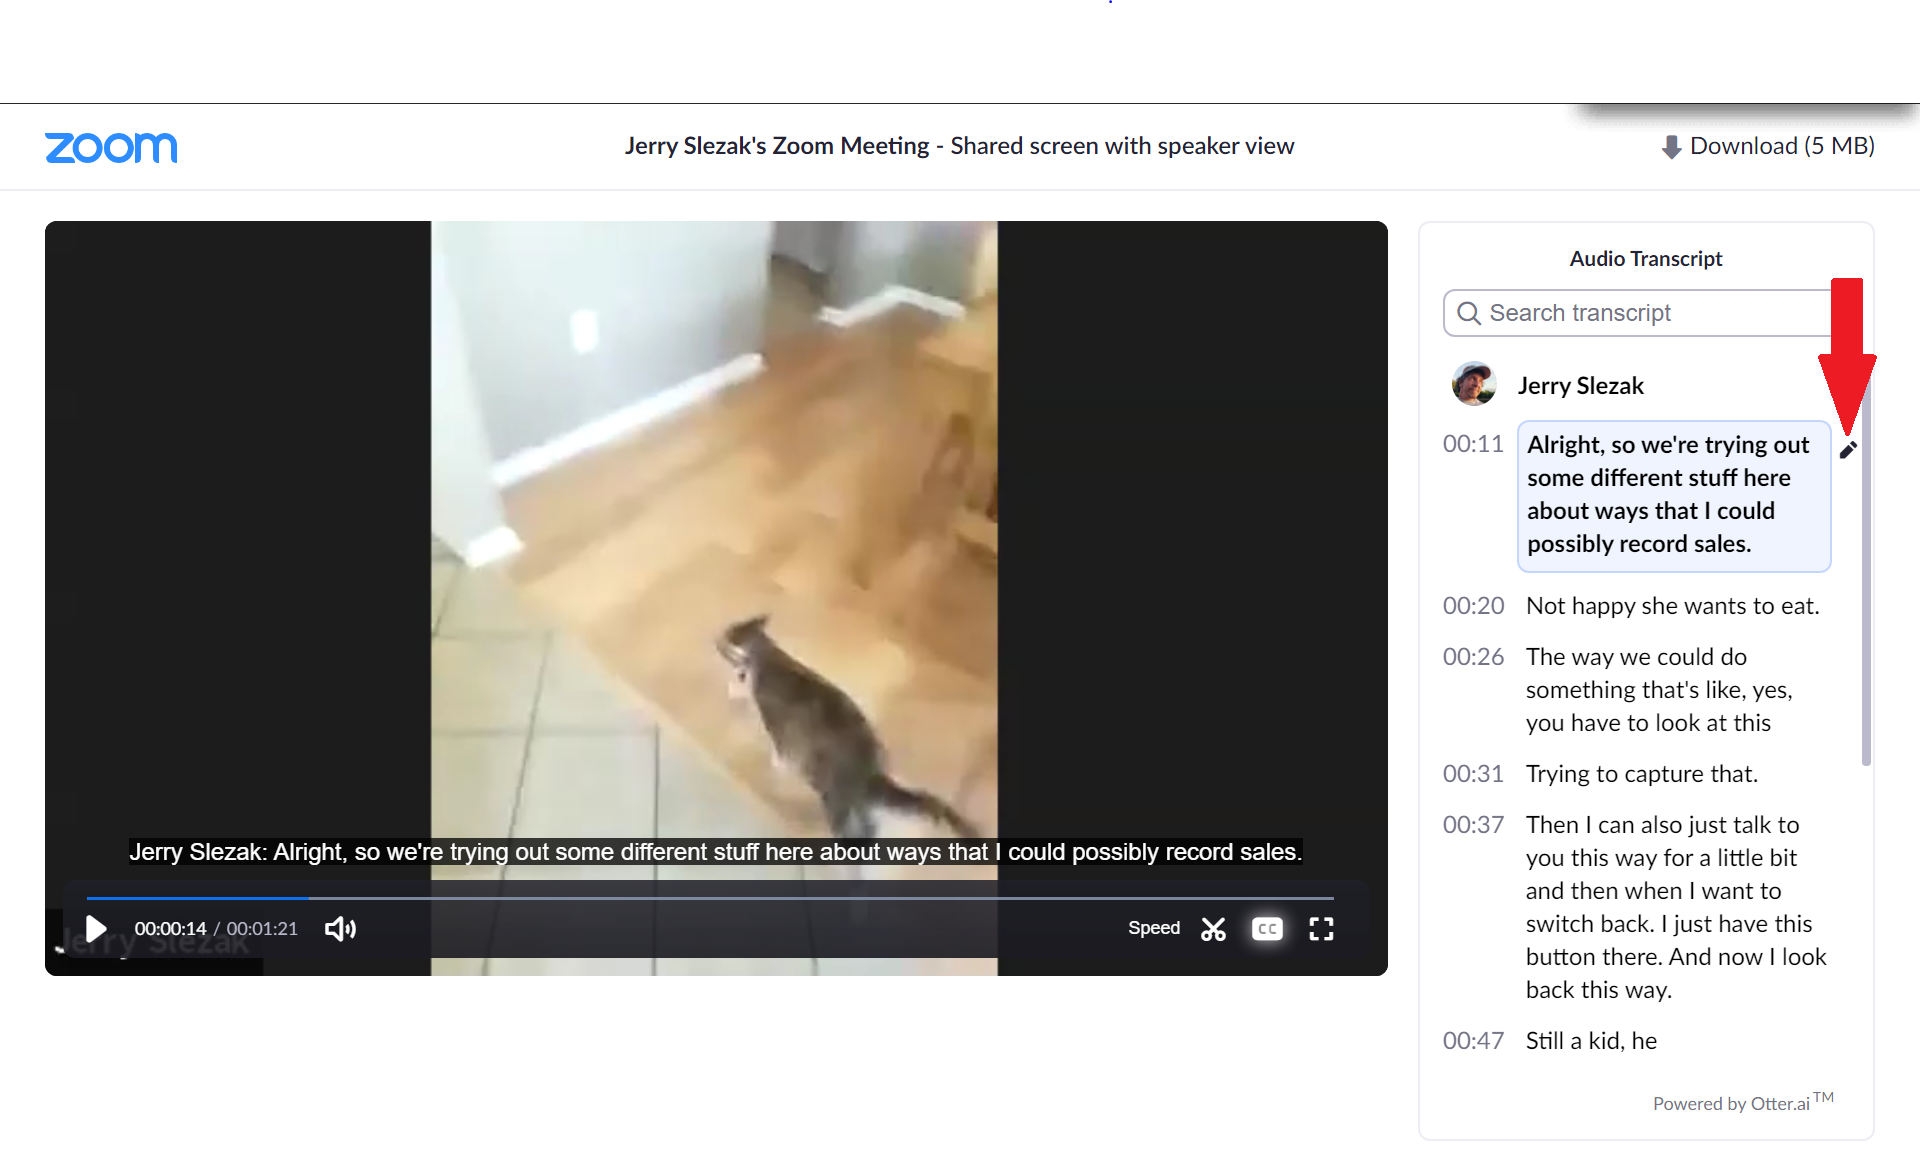
Note: Once a cloud recording is “Published” in Canvas, any student in your Canvas course can view and download the video from the Cloud Recordings tab. If you want to share a recording with your class without giving them the ability to download the video file, you can create a sharing link from your Zoom web portal at https://umw-sso.zoom.us, and share that link instead of publishing in Canvas.You can find more information on adjusting your sharing settings for individual videos in Zoom’s cloud recording support documentation under “Settings for Sharing.” - You can click the title of your meeting to watch the video, download a copy of the video to your computer, or edit the transcript.
- Zoom automatically generates closed captions and a transcript of your meeting, but these need to be edited to ensure accuracy. This is easily done by clicking the pencil icon on the transcript when viewing the video in Zoom.
- Sometimes you may want to trim the beginning or end of your video before releasing it to your students (perhaps you met briefly with a student after class using the same Zoom meeting, and you don’t want that to show up in the cloud recording. You can do this from within the Zoom Cloud Recordings tab when viewing your recording (the same place where you edit your transcript). Just click the scissor icon, and adjust the sliders to the times you would like your videos to start and end.
Note: This will only edit what students can see in the cloud recording, it does not edit the video file itself. You can change the edit at any time, and downloading the video will always give you the unedited video file. By default, only instructors can download videos.
Checking Attendance #
If you are using the Zoom integration in Canvas, you can very easily see an attendance record by going to the “Previous Meetings” tab and clicking the “Report” link next to the meeting. This will show you a list of Zoom users in attendance, along with how long they were in the meeting.
If you are using Zoom outside of Canvas, you can access these reports from the UMW Zoom Web Portal. After logging in with your UMW NetID and password, click “Reports,” then “Usage.” Specify the appropriate date range, and then click the number under the “Participants” column to see a breakdown of users in attendance.