
In order to implement a more targeted approach for contact tracing in classes we are encouraging faculty to use tools available in Canvas that allow instructors to create seating charts and take attendance. This guide will show you how to set this up for use in your course. We also discuss alternatives if Canvas Attendance is not a good fit.
Important Notes #
- UMW does not have a university-wide attendance policy, but it is important to note that Canvas DOES make attendance a grading criterion by default. You must turn off attendance as a grading criterion if you don’t want it to impact a student’s grade in the Canvas Gradebook. Details on this can be found in the Attendance and Grades section of this guide.
- Create your seating chart on the current day only. Moving back or forward in the calendar before creating your chart can cause issues.
- The Attendance tool does not work well for classes where combined sections meet at the same time or for classes that have a lab and a lecture. In these cases taking attendance is still helpful and we recommend you review the Uploading Paper Attendance Sheets option.
- The method we show here works in many classes, but not all classes. If you need further assistance please contact us.
Video Overview #
Setting up a Seating Chart #
Instructions #
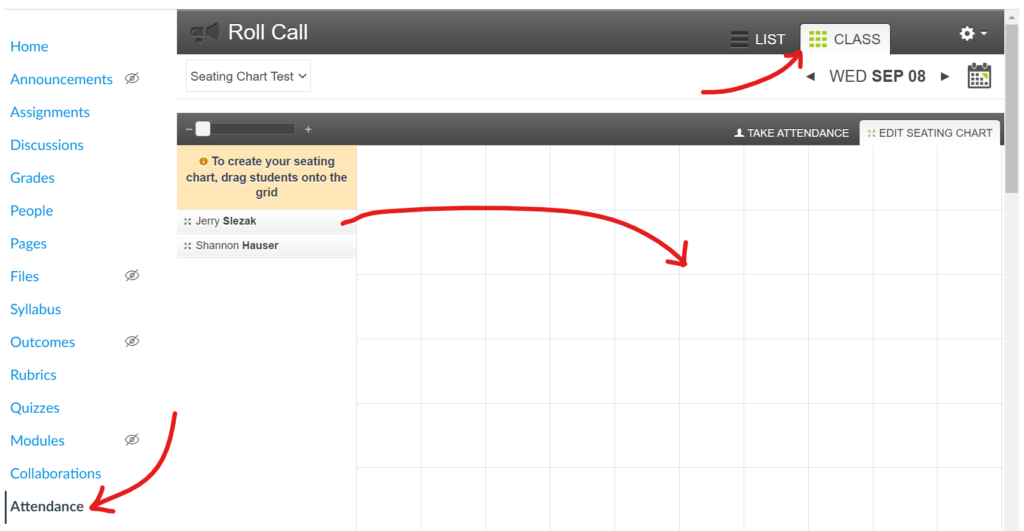
To create a seating chart, click the Attendance tab in the Canvas sidebar, then click the Class tab in the Roll Call window that appears. A list of students enrolled in your course will appear on the left. Drag each student’s name onto the grid to approximate their seating location in the class.
Note: Create your seating chart on the current day only. Moving back or forward in the calendar before creating your chart can cause issues.
This Seating Chart guide from Canvas explains the process of creating a Seating Chart for your class in detail, step-by-step.
Adjusting your Seating Chart #
Once you create a seating chart for the current date, the chart will repeat for all days thereafter. You do not need to make a new chart from scratch for each class. However, if students change seats, you can simply drag that student’s name to a new location on the grid. This new configuration will then repeat for all days thereafter.
Note: Adjust your seating chart for the current day only. Moving back or forward in the calendar before adjusting your chart can cause issues.
Best Practices #
- When creating a chart, consider the top of the chart as the back of the classroom.
- Create and adjust your seating chart for the current day only. Moving back or forward in the calendar before creating or adjusting your chart can cause issues.
- You do not need to do anything extra to show empty seats, tables, or rows. Simply drag the student’s name to your best approximation of their location in the classroom, relative to the students around them.
- Though you can rearrange the seating chart at any time, it is time consuming, and may be difficult to do regularly. You may want to encourage your students to sit in the same seat each class if you are using this tool.
Attendance and Grades #
UMW does not have a university-wide attendance policy, but it is important to note that Canvas DOES make attendance a grading criterion by default. You must turn off attendance as a grading criterion if you don’t want it to impact a student’s grade in the Canvas Gradebook.
When you first use the Seating Chart tool, it will create a “Roll Call Attendance” Assignment in the Assignments tab and a column in the Gradebook. If you intend to use the Attendance tool for grading in the Canvas Gradebook, you can leave this as-is.
If you do not use the Canvas Attendance tool for grading, be sure to go to the Attendance tab in the Canvas sidebar, click the ⚙ (gear) icon, click Roll Call Settings, then check the box next to “Do not count attendance toward final grade.”

Even though you have checked this box, a “Roll Call Attendance” assignment will appear in the Assignments tab and an attendance column will appear in the Canvas gradebook. These can be safely ignored once you’ve checked the “Do not count attendance toward final grade” box. But, if you’d like to remove the attendance column from your gradebook entirely, you can:
- Click the “Roll Call Attendance” assignment in the Assignments tab and click Edit
- Set the “Points” to 0 and Display Grade As “Not Graded”
- Scroll to the bottom of the assignment and click Save
This will remove the attendance column from your Canvas Gradebook.
Taking Attendance #
To take attendance, simply click the Attendance tab in the sidebar, ensure you are on the correct date, and click the student’s name to indicate if they are present (green check). You can also click twice to indicate absence (red X), and three times to indicate the student arrived late (yellow clock).
You can do this from the seating chart by selecting the CLASS tab, or a list view by selecting LIST (shown below).

The status set for each student is associated with a percentage value that can be calculated in the Canvas Gradebook. More information in the Attendance and Grades section of this guide.
To view more detailed step-by-step instructions for taking roll, see this Canvas guide on Taking Roll Using the Attendance Tool.
“What if a student attends virtually?” #
If you are only using the Attendance tool to assist in contact tracing you can simply mark a student attending virtually as absent.
If you already regularly use the Attendance tool to track your students’ attendance as a criteria in evaluation, the best way to mark a student that is attending virtually is to do the following:
- Leave them on the seating chart
- Mark them as present
- Add the “Attended Virtually” badge to their attendance that day.
You can get to the badges by doing the following:
From the List View:
- Select the “More ▸” button.
- Select “ATTENDED VIRTUALLY” badge.

From the Class View:
- Click on the students name.
- Selected “ATTENDED VIRTUALLY” badge from options that appear.


Uploading Paper Attendance Sheets #
For some courses, it may be necessary to take attendance on a paper sheet and upload this sheet to Canvas.
- Note: The method presented below uses the Canvas Teacher app and your cell phone. This method is not required, but presented as an easy way to accomplish this. If you have another way to capture the image of your paper seating chart and upload it to Canvas you are free to do so, but be sure to create an unpublished “Attendance” folder in your files area to place your images.
Follow these steps to upload a picture of your paper attendance sheet using the Canvas Teacher app on your smartphone or tablet.
- Download the Canvas Teacher app on your smart phone or tablet. Follow these links to get the Android App or the Apple iOS App.
- Note: Make sure to get the Canvas Teacher app, not the Student or Parent apps
- If you are logging into the Canvas Teacher app for the first time, open the app and tap Find my school, then type University of Mary Washington
- Log into the app with your UMW NetID and password
- Tap your course from the course list
- Tap Files
- Note: The first time you do this, you will need to create an “Attendance” folder in your files. Follow these one-time only steps:
- Tap the + (plus) icon in top right of the screen
- Tap Add Folder or the folder symbol and write “Attendance”
- By default, this folder should be “Unpublished,” which means nothing in it can be seen by your students. To confirm this, make sure there is not a green checkmark next to your folder.
- Note: The first time you do this, you will need to create an “Attendance” folder in your files. Follow these one-time only steps:
- Tap your Attendance folder
- Tap the + (plus) icon
- Tap Add File or the upload symbol (upwards arrow)
- Tap Use Camera or the camera icon (you may have to give the app permission to access your camera)
- Take a picture of your paper attendance and confirm
- Your photo should be uploaded to the “Attendance” folder (time and date stamps are added automatically)
For more information on the Canvas Teacher app, see Canvas’ guide on the Teacher app here.