
Canvas is UMW’s online Learning Management System. It provides various tools to help faculty communicate with the class, deliver content, as well as assess and grade student work. Every course at UMW has a Canvas course site already created and available for use if the faculty member chooses to do so.
Things to Know #
Canvas can be used to:
- Communicate with students
- Provide documents like PDF readings or your syllabus
- Allow you and your students to participate in online discussions around class topics
- Create online quizzes
- Provide student grades
You don’t need to use all these features – choose what works for you and your students.
Getting Started #
Canvas Basics Course #
A complete online asynchronous “Canvas Basics” course developed by Instructure (the maker of Canvas) teaches new instructors how to get started. This course will guide you through the fundamentals of Canvas, from setting up your user profile to creating content and assignments, as well as how to interact with your students.
To access the Canvas Basics course:
- Log in to Canvas
 In Canvas, click the question mark icon on the left side navigation bar
- In the menu that pops up, scroll down the list and click on the “Training Services Portal” link
- If you see a message asking you to verify your account to access the Portal, follow the instructions to do so
- Scroll down to the “Canvas Basics” course and click the “Enroll Now” link
Support Anytime You Need It #
UMW subscribes to Canvas Support that is available 24/7/365. Instructure, the company that makes Canvas, provides this support to faculty and students. They are in the best position to help you if you have a “how do I…” type of question.
You can access Canvas Support from right inside Canvas. Just click the question mark icon on the left side of the Canvas window. You can call, email or text with Canvas Support. More information on contacting Canvas Support here.
Canvas also has an extensive support website called Canvas Guides. Follow this link to access the Canvas Instructor Guide website, or you can get to the guides directly in Canvas by clicking the question mark icon as described above.
Staff from Digital Learning Support is also available to support Canvas, but availability is more limited. To contact DLS staff about Canvas support, submit a request by clicking here or on the “Contact DLS” link at the top of this page. We will be in touch as soon as possible.
Logging In #

From the UMW/in website, click on the Canvas icon. Enter your NetID and password to log into your Canvas account. You can also access Canvas directly by going to https://canvas.umw.edu/
Canvas Overview for Instructors #
This video shows you the basic navigation in Canvas.
Canvas Notifications #
Canvas can notify you in different ways for different events, such as text you when a student submits an assignment. This video tells you how to control your notifications from Canvas.
Communicating With Students #
Making Announcements #
Announcements allow instructors to communicate with students right inside of Canvas, thus avoiding communication that can become unwieldy to track via regular email. Instructors can broadcast information out to all members of a course or to all members of sections within a course.
Sending and Receiving Messages #
Canvas allows you to communicate with students right inside Canvas. This is helpful in that it keeps communication for each class organized by course. You can decide when and how to be notified if you receive communication from students in Canvas.
Providing Documents #
Post Your Syllabus #
The Syllabus tool in Canvas allows you to paste in content from Word files, or directly link to a file stored in Canvas (more on uploading files is in the next section). This feature also automatically creates links to all the assignments you create in Canvas so the syllabus info and assignment info is in one place for your students. More detail on this feature is available on this page from the Canvas Guides.
Posting and Managing Files #
Store and share files within your Canvas course in the Files space. Please note that at UMW courses are allotted 1GB of space. Please see the Storage in Canvas section below for more details about our recommendations for storing large files.
#
Creating Pages #
Pages store content and educational resources that are part of a course or group but don’t necessarily belong in an assignment. Pages can include text, video, and links to files and other course or group content. Pages can also be linked to other pages.
#
Creating Modules #
Modules allow instructors to organize content to help control the flow of the course. They can be used to organize course content by weeks, units, or a different organizational structure. Modules essentially create a one-directional linear flow of what students should do in a course.
Online Discussions and Groups #
Discussion Boards #
Canvas provides an integrated system for class discussions, allowing both instructors and students to start and contribute to as many discussion topics as desired. Discussions allows for interactive communication between two or more people; users can participate in a conversation with an entire class or group.
Discussions can also be created as an assignment for grading purposes (and seamlessly integrated with the Canvas Gradebook), or simply serve as a forum for topical and current events. Discussions can also be created within student groups.
Discussion topics can be organized as focused or threaded discussions. Focused discussions only allow for two levels of nesting, the original post and subsequent replies. Threaded discussions allow for infinite levels of nesting. Focused discussions are relatively short-lived interactions, while threaded discussions allow replies within replies and may last for a longer period of time.
Online Groups #
Groups can be used in several different areas in Canvas. Groups are commonly used for breaking up a larger discussion into smaller groups, or for assigning group projects. Instructors can create groups for students to work together on group assignments, pages, collaborations, and more. Instructors can also allow students to create their own groups.
Assignments and Assessment #
Creating Assignments #
Assignments in Canvas can be used to challenge students’ understanding and help assess competency by using a variety of media. The Assignments page shows students all of the Assignments that will be expected of them and how many points each is worth. Assignments can be assigned to everyone in the course or differentiated by section or user.
#
Quizzes #
Quizzes in Canvas are assignments that can be used to challenge student understanding and assess comprehension of course material. The quiz tool is used to create and administer online quizzes and surveys. Quizzes can also be used to conduct and moderate exams and assessments, both graded and ungraded.
#
SpeedGrader Feature #
As an instructor, SpeedGrader allows you to view and grade student assignment submissions in one place using a simple point scale or complex rubric.
#
Canvas Gradebook #
The Gradebook stores information about student progress in the course, measuring both letter grades and course outcomes. Canvas has an extensive gradebook feature that can be customized to accommodate different grading schemes.
Storage in Canvas #
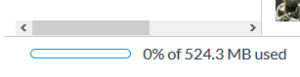
Canvas has a limited amount of storage available (1GB) for each course. If you are unsure of how much space you currently use you can find out by doing the following:
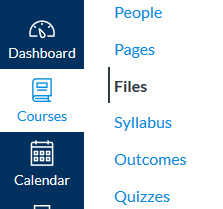
- Inside your Canvas course click on the “Files” link in your navigation sidebar.
- Once in Files scroll to the bottom of the page where you should a bar that will tell you how much space you’ve already used.
If you need more than 1GB of space for your course you’ll need to host files externally. We are recommending you utilize OneDrive storage for files, but there other cloud storage options such as Google Drive and Dropbox you may be familiar with. To learn more about OneDrive storage available to you as a UMW faculty member please read our OneDrive guide. Additionally, if you need to host video files we recommend either YouTube or ScreenPal and then linking or embedding the video in your course.
Using OneDrive as Storage for Canvas content #
As mentioned in the OneDrive guide we recommend creating folders for each class to help you manage the files for your courses. Once you’ve created these folders you can begin to upload files to the folder or create certain types of files (Word, Excel, PPT) from right inside OneDrive. The important thing to remember is you need to make sure these items are not private so that when you link to them your students will be able to see them. You can find more about permissions on our OneDrive page.
Inserting a link in to a Module #
If you are using Canvas modules to link to files you’ll want to do the following:
- Once your module is created you can add items to the module by clicking the + button in the corner of the module box.

- This will bring up the add item to module options. From the first dropdown you’ll want to select “External URL”

- Paste the shareable URL from OneDrive. It is important you’ve set the permissions for the file correctly otherwise students won’t be able to access the file. See the OneDrive guide for more details about setting permissions for UMW access.
- Use the Page Name field to title the link with something descriptive (e.g. Awesome Class Powerpoint Lecture).
- You can check the “load in a new tab” to have the item load in a new page. We have found this often works better than the default embedded view.
- Click “Add item” to add it to your Module.
Inserting a link in to other places in your Canvas course #
If you don’t use Modules you can use the linking feature in the rich content editor to create a nicely displayed link. This feature is available in a variety of places including Pages, Announcements, and Discussions. In the rich content editor you can insert a link by highlighting a word, selecting the link icon, and pasting in the link. Alternatively you can first select the link icon, paste the URL, then update the displayed text for the link.

Additional Resources #
Canvas Guides: A robust support website produced by Instructure, the maker of Canvas. You can access the guides by clicking this link, or directly inside Canvas by clicking the question mark icon as described in the Support section at the top of this page.
Growing With Canvas: a complete Canvas course developed by Instructure (the maker of Canvas) that teaches instructors how to use Canvas. This link points to the preview version of the course and allows you to see the content.
Integrating with Zoom: a guide to for utilizing the Zoom integration in Canvas.
Acknowledgements #
Resources on this page came from the Growing With Canvas course created by Instructure, licensed under a Creative Commons Attribution-NonCommercial-ShareAlike 4.0 International (CC BY-NC-SA 4.0) https://creativecommons.org/licenses/by-nc-sa/4.0/